The Morse Riddler is a circuit I designed to be simple and cheap enough for kids and adults to use as a first soldering project, but powerful enough that they could have fun with it. In fifteen minutes, it can be soldered together and programmed to send riddles and their answers in Morse Code. Each press of the button will play one Morse Code message, which is either a new riddle or the answer to the last riddle. After a message, the chip goes into deep sleep to save power, not “waking” until the button is pressed again.

Morse-Riddler-Closeup

It’s a very basic circuit, just giving power from a coin cell battery to a microcontroller, and connecting the microcontroller to an LED and a piezo buzzer. The microcontroller is an Atmel ATtiny85 programmed using the Arduino development environment. A momentary switch grounds the reset pin when pressed. The firmware sends a message upon waking and then goes into low-power sleep.

MorseRiddlerCircuit

It uses the following parts:

I designed the circuit boards myself, and had them manufactured by OSH Park. You can order more of them through the link above. Like the other links, though, I’m not making money from this, I’m just sharing my work and sources to help other folks make stuff.

You can find my code on GitHub. You will see the functions for making dots, dashes, spaces between letters, and spaces between words. The code also contains a bunch of power-saving stuff that might be scary to a beginner, but it’s just there to let the circuit sleep between riddles. I’ll keep tweaking the code for clarity and power consumption.

When doing the workshop with kids, I give them this handout to take home.

Happy Making!

Roping Dummy

My son wanted to learn to use a lasso, so I built us a Steve the Steer to play with. I have no desire to rope a live animal, this is just something fun to fiddle with in the backyard.

I was cleaning out the garage when I realized I had the parts on hand to make a dummy. The head was a scrap of 6×6 that I sculpted with a SawZall, bandsaw, and sanders. The horns were Hoppium IPA. The yellow strap on the head is a bit of climbing webbing, used to stabilize the horns. The body and legs are just 2×4, but I ran out, so he only has a single leg in the back. The next step is to add skis so one of us can drag him around while others try to catch him.

After I got the idea for the Mission Control Desk, it almost immediately occurred to me that we should have a spaceship of some kind to go with it. My son really did need a desk for school, though, and I had to finish that before starting on the spaceship.

This spacecraft is my favorite project ever. Not only was it challenging and educational for me, it will be great fun for the boys, while also encouraging them to work a lot of teamwork into their play.

You can read more details at the original post on the Makezine site.

Each Christmas, I like to participate in Cheerlights, an Internet of Things system for synchronizing the colors of multicolor Christmas tree lighting. To command the trees of the Cheerlights service, all you have to do is send a tweet with “@Cheerlights” and the name of a color. In the past, I built and modified a tiny desktop tree display. This year, I went all out, not only outfitting my big Christmas tree with color-changing lights, but also building a robot to roam the house and hunt for colors.

Read more details from my post on the Make Magazine site.

Meditation strikes a special chord with me as a maker because it is said to foster creativity, intuition, imagination, and fantasy. I can’t think of traits better suited to making. I’ve tried meditation in the past, but it didn’t seem to stick. When I saw that NeuroSky’s Mindwave headsets had dropped to $100, I couldn’t resist trying meditation again, this time with feedback. These headsets measure electrical signals from your brain and determine two main metrics: attention and meditation. The charts and graphs in the headset’s app worked well enough for measuring attention, but the very nature of meditation is that you can’t focus on charts and graphs while doing it. I set out to build a more peaceful and serene visual output for my headset, one that would actually serve to calm me even further as it displayed the depth of my meditation.

Read more details at my post on Make Magazine site.

Part of what makes me a maker is that I prefer to do things myself when I can. I even cut my own hair. Nothing fancy, mind you, just a quick buzz cut with a trimmer. The tricky part, though, is cutting a good line across the back of the neck. It’s not only hard to trim, even using multiple mirrors, but it’s quite obvious when I haven’t been keeping up. Usually I ask my wife to help me, but I like to be self-reliant, and decided to see if there was a fun and educational way to trim it myself.

Pondering this problem, the two things that came to my mind were computer vision and automated heavy equipment. I figured I could use computer vision to track my head and the trimmer, and besides, I have long been looking for an excuse to learn about computer vision. I thought of construction equipment as a model because some control systems for bulldozers use GPS to locate the machine, and then adjust the blade according to the requirements of the site plan. In theory, the bulldozer operator could just drive back and forth over the site many times, and the control system would handle the height of the blade to result in a perfectly sculpted site. I set out to build a trimmer that I could blindly run up and down the back of my neck, and have it automatically turn on or off in accordance with its position.

Read more details on my post at Make Magazine.

Faced with a wiggly-toothed toddler, I realized that we’d be starting the old Tooth Fairy routine soon. Being a bit of a non-conformist, I began to dream up non-conventional ways that we might carry out the Tooth Fairy tradition in our house. I decided that the Tooth Fairy was probably getting overwhelmed by the increasing world population, and would appreciate it if we could send the teeth directly to her. I installed a pneumatic transport system in my house to make it happen.

PTS System Diagram

Check out the full post on Make for more details.

In my latest “Making Fun With Jeff Highsmith” video, I demonstrate the building and use of a self-contained alarm system designed around the Raspberry Pi computer. The idea for the project occurred to me when my older son asked for help keeping his little brother out of his room. We had some great father-and-son time working on it. You can find a more detailed writeup, along with diagrams, flowcharts, and links to the code at the Make Magazine website. Here is the video:

Here is the circuit diagram:
PiNopticon Circuit Diagram full res

Tiny Treehouse

Tiny Treehouse

Having spent the week away from home, I returned with an itch to build something. When the boys started making treehouses out of Duplo blocks, inspiration struck. I grabbed the saw from the garage and walked out the woods where I found a suitable dead branch. Back in the garage, I quickly screwed a scrap of cedar to the bottom of the branch and then picked up the glue gun and the craft sticks on the way back into the house. The boys placed a fair amount of the sticks after I had applied glue, and they cut out all of the leaves. It was a fun afternoon project for all! A few weeks back, Gavin asked me to build a treehouse, and though I think this technically fulfills my obligation, I’ll still help them build a human-scale treehouse some day.

Make is my “desert island” publication. If I could only pick one website/magazine to bring with me while stranded on a desert island, I would pick Make. My hobbies and interests have quite a range, but I think that making fun things out of a variety of materials is what consistently interests me the most. I have been a reader of Make Magazine since the first issue, and their website has occasionally mentioned some of my projects. This month, though, I’m beginning to contribute on a more formal basis, with my own monthly video series titled, “Making Fun with Jeff Highsmith”. In it, I hope to use playful and fun projects to inspire folks to make things in the same vein or just to make things, period.

Make just ran the announcement of the series with nice bio of me. Here’s my first video, in which I modify a toy race car set to enhance it’s playability:

The code for the Arduino is on GitHub.

Coke Can Jet Ski Steamboat

Using a tea-light candle for heat, this little feller slowly putt-putts around. The can is still in one piece. I cut the opening so that the fold-out parts form the rider and the handlebars. Eighth-inch brass tubing is coiled over the candle. To operate, I just fill the tubing with tap water and then cap the ends with my fingers while submerging them to keep the tubing filled. I then light the candle. The heat expands the water, which pushes the boat forward. Colder water rushes in, and the process repeats, resulting in a vibrating putt-putt locomotion.

I’ve thoroughly enjoyed attending the last couple North Carolina Maker Faires. This year, I felt that I’ve finally built enough interesting gadgets to host an exhibit of my own. “The Creative Contraptions of Jeff Highsmith” will be a small table or two containing a few of my more interactive builds. The idea of the Faire is to engage visitors and inspire them to keep or start making fun stuff of their own. My projects are well-suited for this because they are original enough to be cool, but simple enough for most people to make, especially if they’re willing to learn a little.

I’ll borrow back my climbing game from the break room at REI.

Dispatchatron Senior has been in storage but will be ready with a little dusting and a few more toy fire trucks.

Dispatchatron Junior is always ready to travel, being smaller than a gallon of milk.

Additionally, I’ll have two more projects on display, a race track toy that I seriously enhanced and a scratch-built, multi-piece play set inspired by a Dr. Seuss book. These projects are complete, but I haven’t gotten the videos published yet.

I’ve also been working with a few fellows that are going to be launching a balloon into near-space from the parking lot of the Maker Faire. I’ve been writing code for the telemetry system while others are working on the other (harder) aspects.

The Faire will be awesome, I’m sure.

Anapestic Tetragraph

Around this house, we love the books of Doctor Seuss. They’re easy to read (with the exception of Fox in Socks, one of my favs), have great messages, and contain fun illustrations of crazy contraptions. The books almost always follow the same poetic meter, anapestic tetrameter. During Dr. Seuss Week a couple years back, I was moved to write a book in anapestic tetrameter, featuring Gavin and his favorite stuffed animal. Traci took pictures to match and we published it on our family website as The Ape in the Cape.

This year, inspiration struck me in the form of a tool that would help people learn and use anapestic tetrameter to write their own poems and books. I call it my Anapestic Tetragraph.

Anapesetic Tetragraph

By rolling it on the ink pad and then on the paper, you can quickly set up a guide that tells you which syllables should be stressed. It’s nothing more than a homemade stamp roller, I know, and the marks it makes on the paper aren’t anything you couldn’t sketch up with a pencil. I had plans for the tool to make the sounds of anapestic tetrameter as it marked them, but I couldn’t scrounge anything suitable to make percussion sounds in such a small package. Plan B, optical encoding and electronic sounds, didn’t account for handle orientation and got scrapped during the breadboard phase, though you can still see the holes on the wheel and handle. Plan C was a complex series of tiny switches hand-made from guitar string, but that was getting too complex for such a simple and silly toy. I’ve ordered some microswitches for plan D. When those arrive, I’ll see if that plan works any better.

For the device’s construction, I used a CAD program to make templates for the shapes and the positions of the stamps. My scrollsaw made quick work of cutting the templates out of 1/4″ thick expanded PVC sheet. I cut the individual stamp bits out of thin craft foam using scissors for the “ana”s and a whole punch for the “pest”s. Hot glue holds the stamps to wheel.

Anapestic Tetragraph Template

As it is now, it’s still lots of fun to use. You just roll it on the stamp pad to ink it up, then roll your paper. As infrequently as I write poems, I need all the assistance I can get. It definitely helps to have the meter down first as a guide. Make your own and have fun writing some poems.

The Cat’s Meow

As a gift for the person watching our cats while we were on vacation, I whipped up a charming little electronic kitty cat.


I already had most of the circuit soldered together, as it was one of my failed (too big, physically) prototypes from my office chair lowrider enhancement. To make it more feline, I added some cat parts and reprogrammed the ATTiny85 (running the Arduino core) to make the closest approximation of a meow that I could manage. It’s not easy to express a meow in C, believe me. If only you’d heard some of the horrible sounds I rejected, you might think more highly of the sound I settled on. I had a greeting-card-style digital recorder module in my parts bin, but it seemed like cheating to use it. I wanted to give a gift that could be be repurposed into all kinds of things, and an Arduino circuit is that. I even put a programming header on the cat.

Take a look at my code and email me if you can think of any better way to programmatically meow.

/*

Cat’s Meow, by Jeff Highsmith

circuit:
* 8-ohm speaker on digital pin 3
* Power supplied by contact switch when tail is pressed.

*/

void setup() {
}

void loop() {
// Meee
int i=60;
while( i < 1500) { tone(3, i,1); delay(1); i=(i+2); } i = 1100; // ooo while (i>400) {
tone(3,i,3);
delay(3);
i=i-(i/80)+1;
}
// ww!
while(i<600) { tone(3,i,4); delay(4); i=i+(i/40); } noTone(3); } [/code] Finally, here's a circuit diagram that would be easier to understand if I didn't insist upon making it vaguely cat-shaped. Cat's Meow Circuit Diagram

Now I’m imagining a whole desktop menagerie of circuit board animals. I also have a much greater appreciation for all the rough sounds emitted by my kids’ toys.

Dispatchatron Junior Portrait

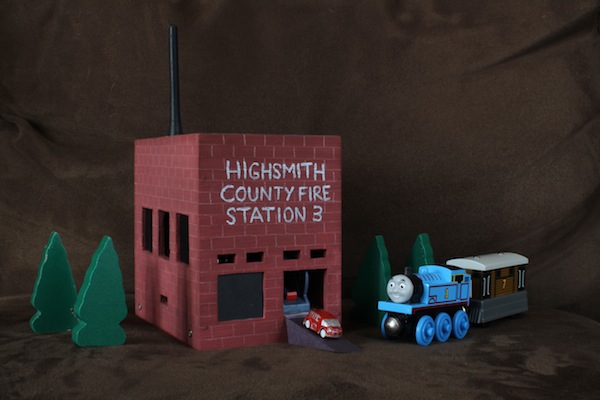
As a Christmas present for Jasper this year, I made him a smaller version of my Dispatchatron invention, sized just right for the train table. Dispatchatron Senior was rather large and had to be put in storage when we could no longer spare the space. Dispatchatron Junior, however, can fit in a hat.


In short, the Dispatchatron Junior monitors the computer-voice (no humans) dispatch radio frequency of the county fire department and launches a toy fire truck onto our train table whenever the county dispatches a real fire truck. Even though the radio dispatches are just a computer voice giving addresses and unoffensive descriptions of the problem, I normally keep the volume just loud enough to be an effect, not loud enough that the boys will start parroting the dispatches.

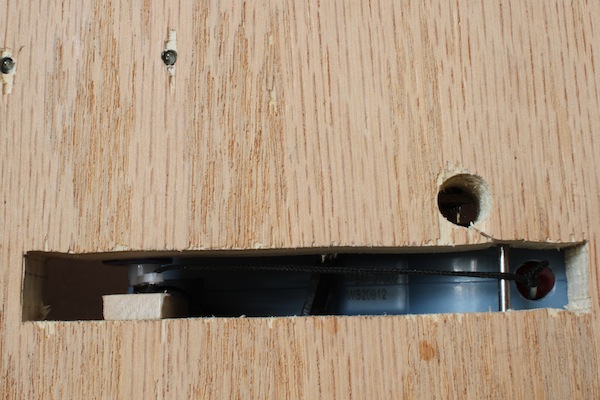
I was inspired to make the Junior version after seeing a handheld car launcher for sale in Target. The dime-sized car uses a capacitor which is quickly charged (in 5-8 seconds) by two AAA cells in the launcher. One button charges the car, and another button levers down a gate, releasing the car.

Micro Chargers Package

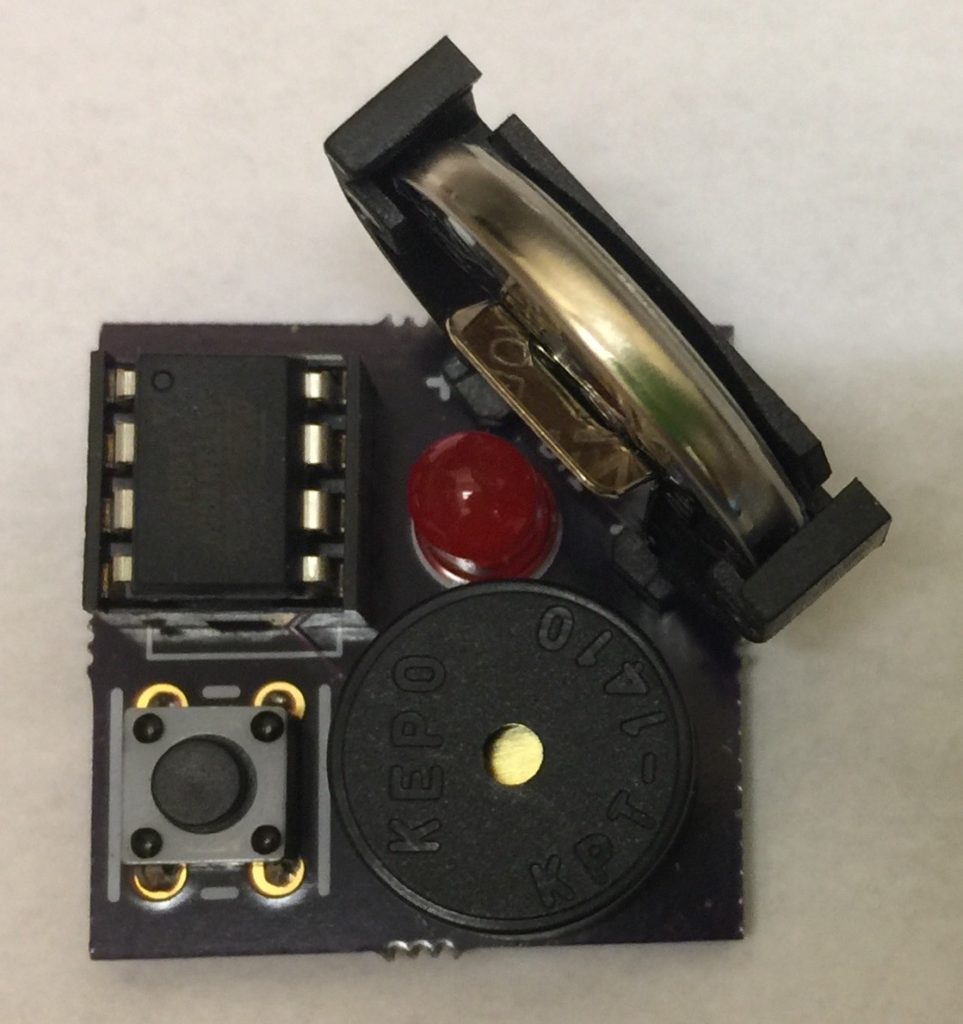
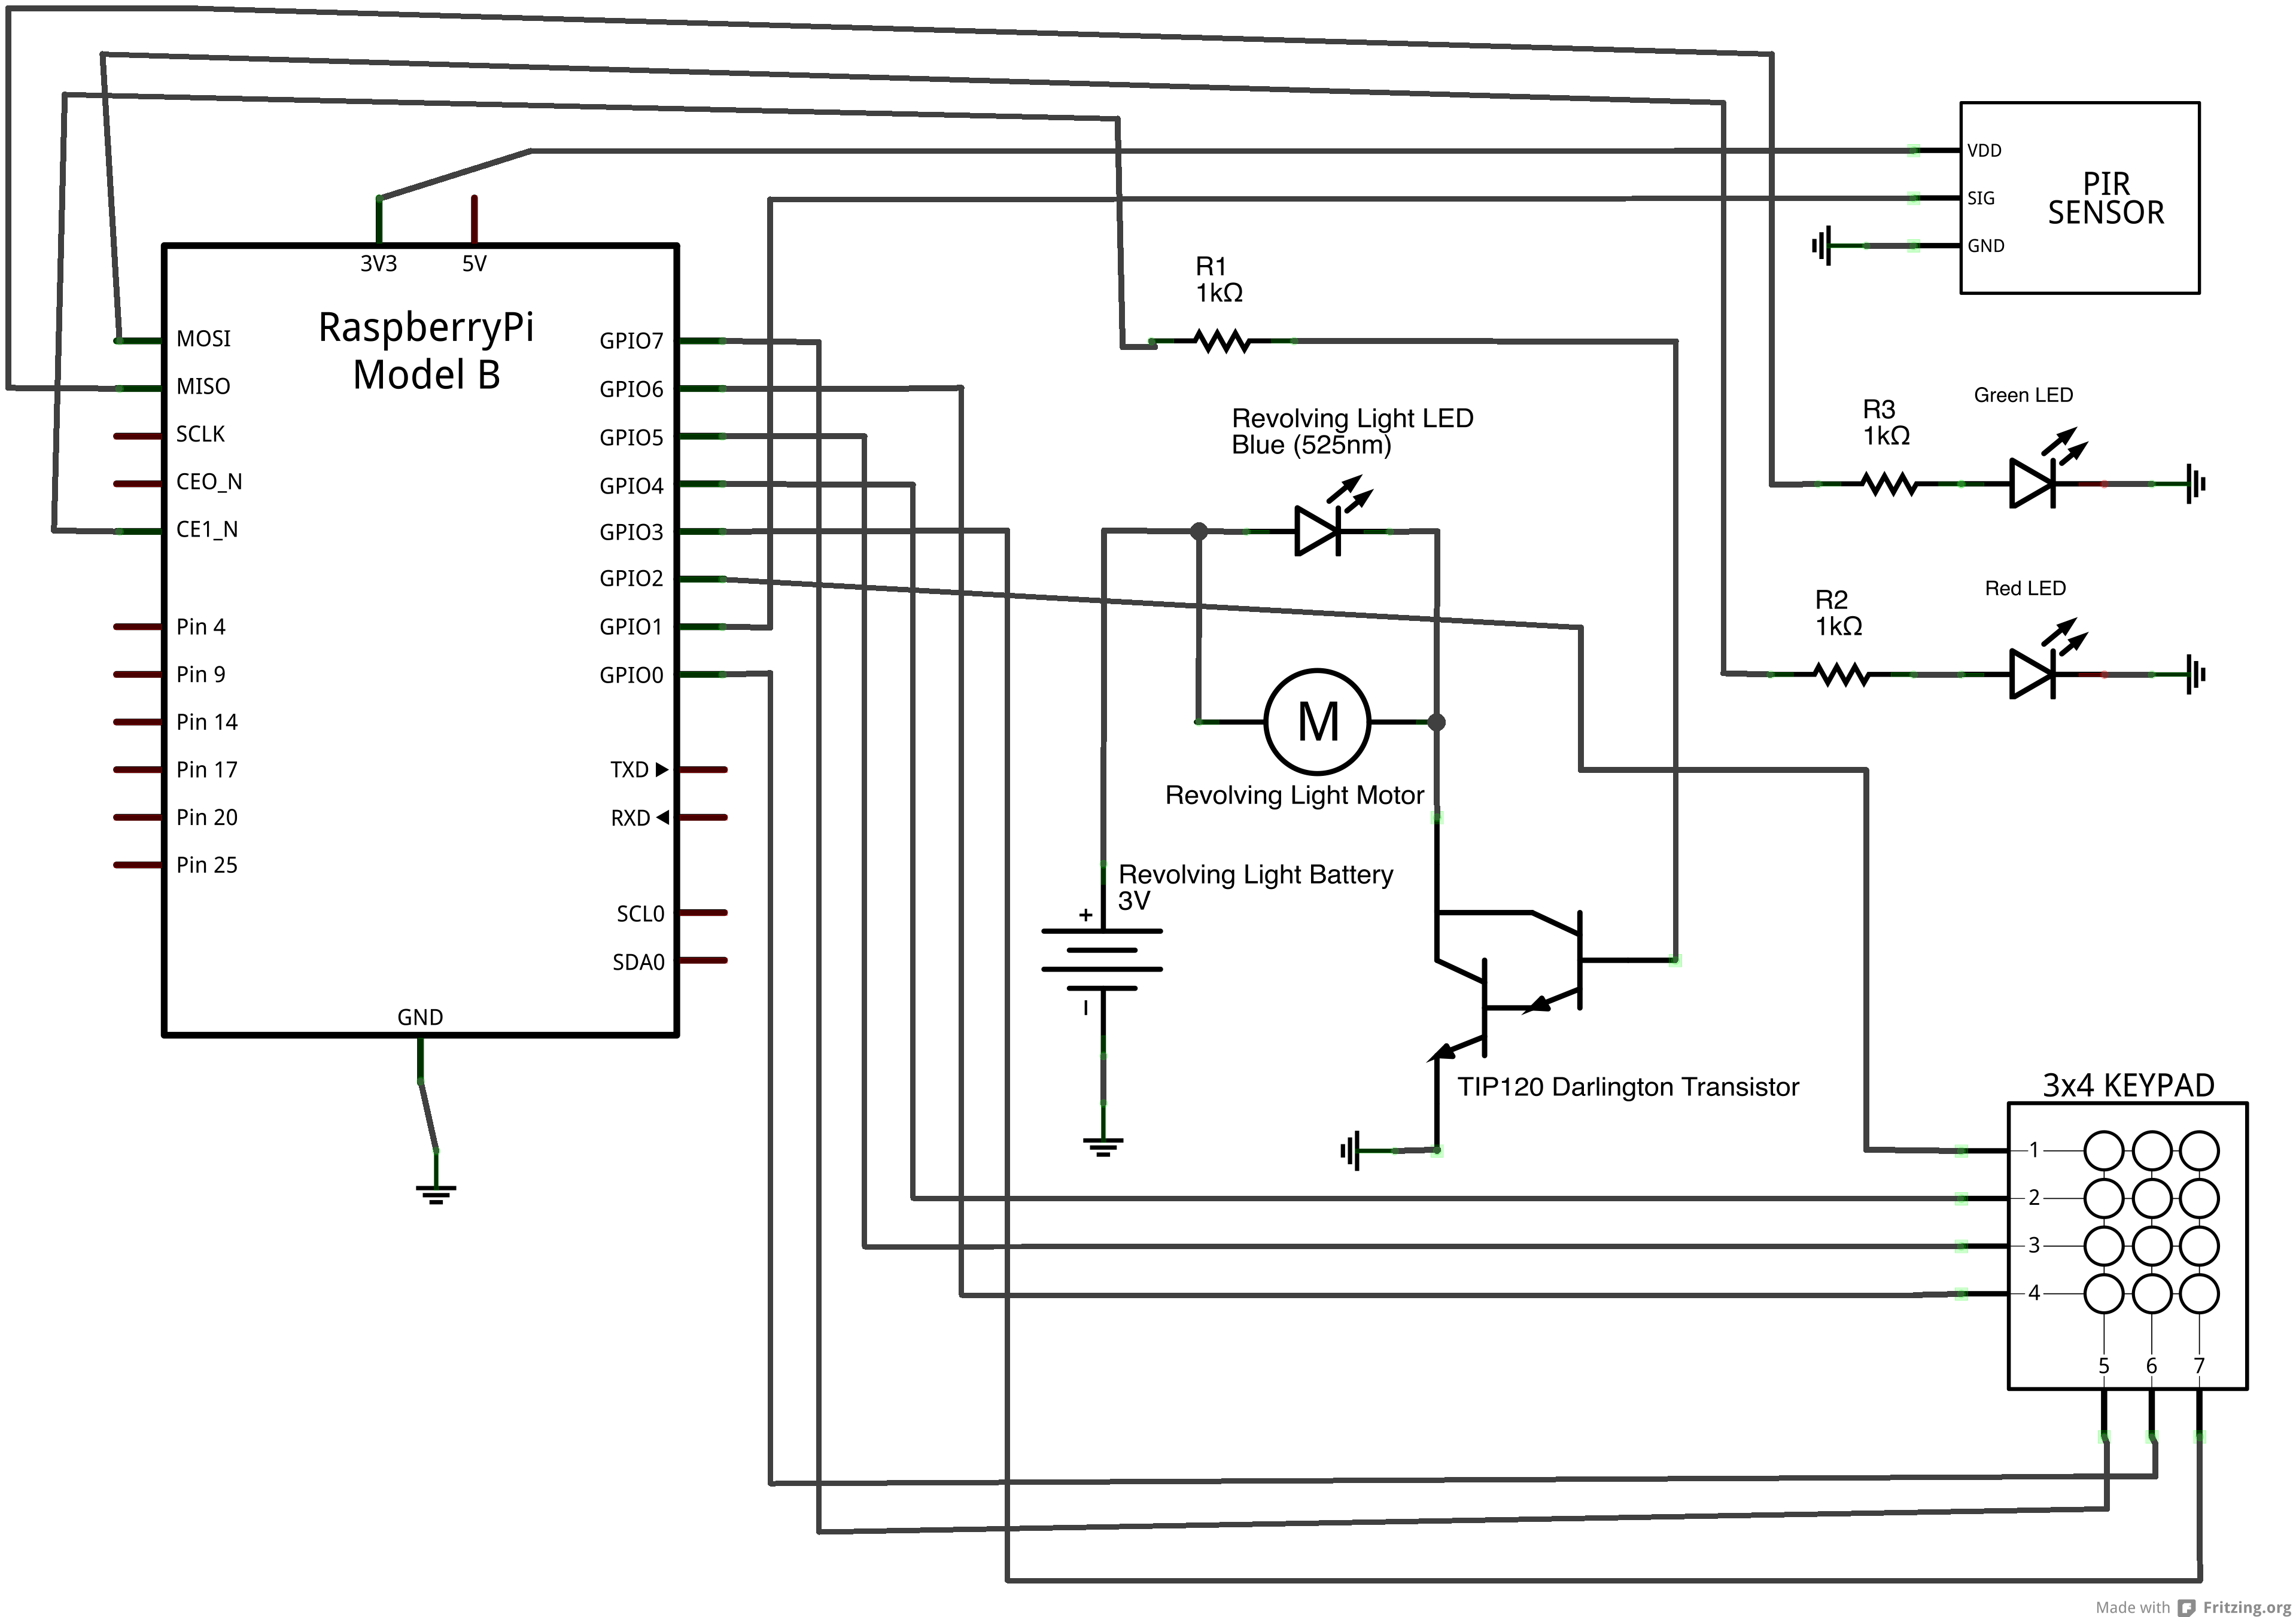
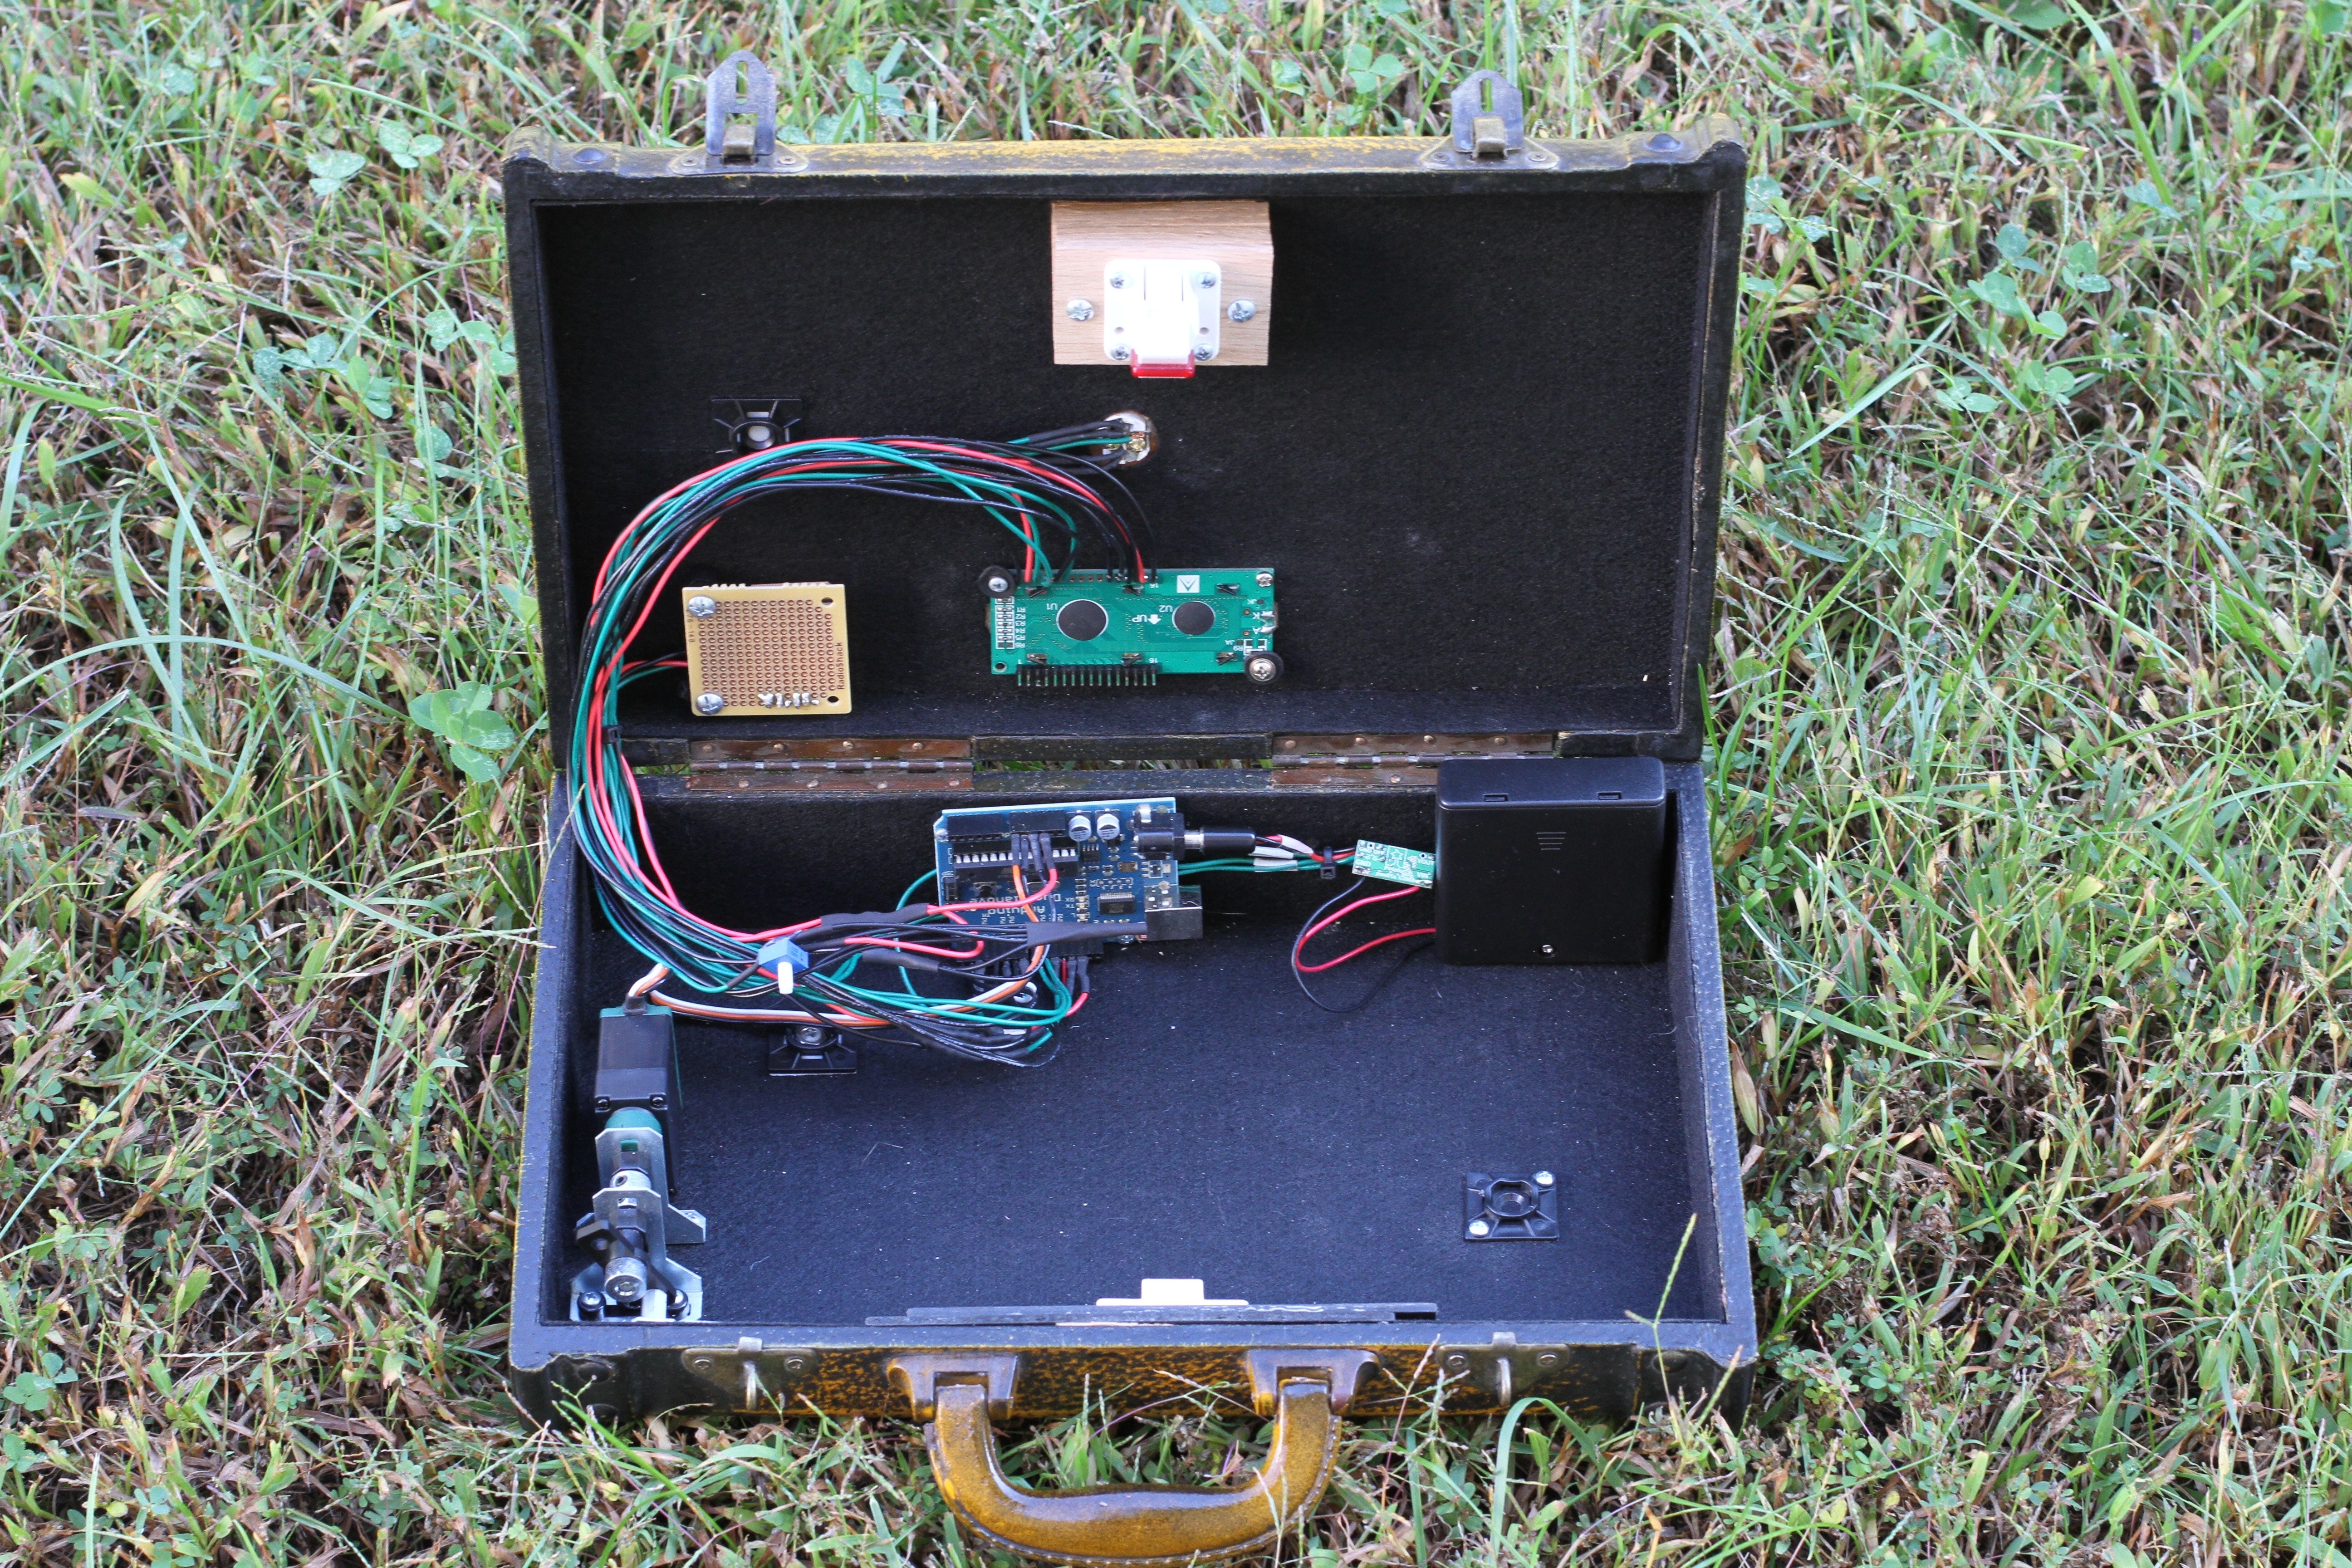
To incorporate the toy into my contraption, I cracked it open and replaced the charge switch with a relay & transistor circuit to be operated by a microcontroller. I discarded the release button and connecting rod, leaving only the spring-loaded gate. I drilled the bottom of the launcher case and put a tiny eye-screw into the bottom of the gate. I mounted the launcher to the plywood base of the fire station, having cut a slot in the base to allow a string to run from the gate eyelet to a small servo.

Servo Slot

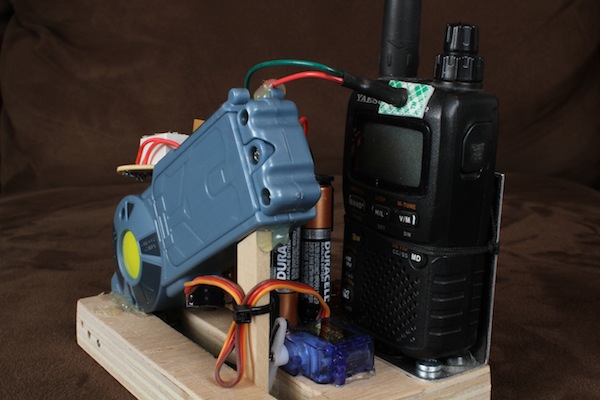
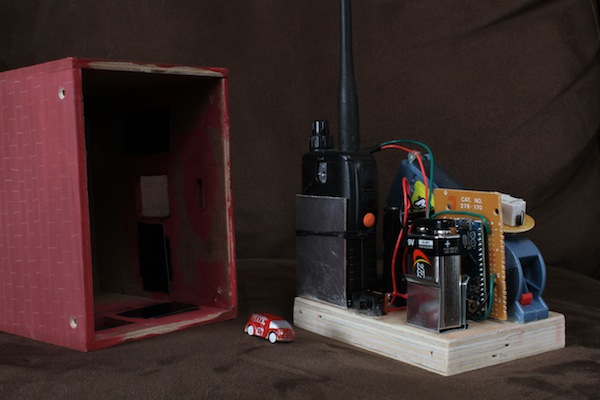
The small ham radio handy-talkie is mounted to the base with a scrap of thin aluminum. The microcontroller is an Arduino MICRO that I won in a trivia contest on Adafruit’s Ask An Engineer show for being the first to answer the question, “What material was used to make the case for the NeXT Cube?” I attached a light sensor (a light-dependent resistor) to the status light on the radio, so the microcontroller can sense when a radio call is coming through. When a dispatch occurs, the radio sends the live audio out of its speaker and simultaneously lights the status light.

Sensor and Servo

Inside the Fire Station

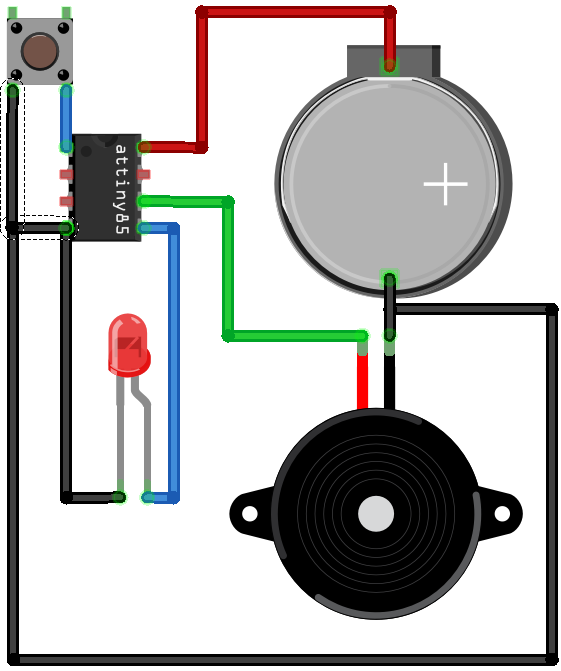
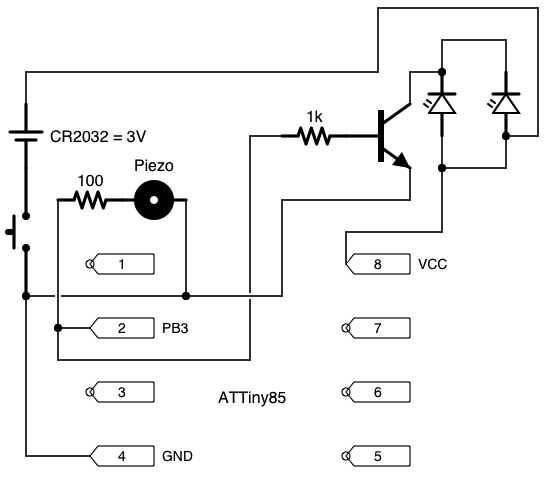
Here’s a quick and dirty diagram of the circuit layout:
Dispatchatron Junior Circuit Diagram

In the future, I might consolidate the various batteries into a single one with multiple regulators for easier recharging.

The code for the Arduino MICRO is quite simple:

// Dispatchatron Junior

#include <Servo.h>

Servo carGateServo;
long lightLevel;
long lastLaunch;
long ambientLight;

const int lightSensor = A5;
const int launchRelay = 11;
const int GATEDELAY   = 600;
const int CHARGEDELAY = 5000;

void setup()
{
  pinMode(launchRelay, OUTPUT);
  pinMode(lightSensor, INPUT);
  digitalWrite(launchRelay,LOW);
  Serial.begin(9600);
  carGateServo.attach(3);
  carGateServo.write(50);
  lastLaunch = 0;
  ambientLight = analogRead(lightSensor);
  Serial.println("Setup complete.");
}

void loop()
{
  // Record the light level from the sensor...
  lightLevel = analogRead(lightSensor);
  // If the light level has increased AND it has 
  // been a minute since the last launch...
  if((lightLevel > (ambientLight+100)) && ((lastLaunch + 60000) < millis())) {
    // Wait until the radio dispatch is over...
    while(analogRead(lightSensor) > (ambientLight+100)) { // While the light is on...
      delay(500); // Wait another half-second.
    }
    launchCar(); // Then launch the car when the light goes off
  }
  delay(1000); // No need to waste energy checking too often
}

void launchCar()
{
  lastLaunch = millis(); // Record the time of this launch
  digitalWrite(launchRelay, HIGH); // Charge the car
  delay(CHARGEDELAY); // Wait for the car to charge
  digitalWrite(launchRelay, LOW); // Stop charging the car
  carGateServo.write(100); // Lower the gate, releasing the car
  delay(GATEDELAY); // Wait for the car to leave
  carGateServo.write(50); // Close the gate to allow reloading
}

I built the fire station walls and roof out of thin plywood and painted it with a simple brown and red mix of kids’ craft paint. I pencilled in brickwork with a white pencil and (somewhat sloppily) painted the name of the fire station on the front. The car that came with the launcher was a yellow, rocket-powered, Prius knockoff. I painted it to look like a fire truck using glossy red and silver craft paint. Neither paint job is perfect, but both are plenty good enough for a two-year-old.

Now the boys’ daily train play is augmented by the occasional excitement of a toy fire truck driving itself around the table.

Post Zero

Greetings and salutations! My intent for this blog is to have a place to scrapbook my various and sundry projects. In the past, I’ve posted the kid-related projects to my sons’ blog and the rest to my Flickr photostream. Since I’ve been sitting on the jeffhighsmith.com domain for awhile, I decided to put it to use and have a consolidated spot for more technical descriptions of my contraptions.

Some of my favorite past projects include:

Web-controlled Car Launcher

Cigar Box Guitars

Peak 97 Climbing Arcade-Style Game

Teaching Gavin Orienteering

Reverse Geocache

Dispatchatron

Scaredy Squirrel’s Nut Tree

Napless

Lowrider Office Chair

Motobackhoecycle

Remote-Controlled Pumpkin Tractor

Popscicle Stick Helicopter

Unicycle Dump Truck

Cheerlights Tree

Construction Machine-Themed Tote Bags

Elf-Led Robot Making

Gavin’s First Robot Kit

Green-Powered Gingerbread House


20130528-133034.jpg

Emboldened by the runaway success of my motobackhoecycle, I decided to expand my enterprise of impractical construction machines. I present the unicycle dump truck, a one-wheeled, self-balancing, load-carrying machine.

20130528-132814.jpg

20130528-140904.jpg
This box contains a microcontroller that keeps the box locked from the inside until its GPS sensor detects that the box is located at coordinates I can specify beforehand. Basically, I program the box for a certain location and lock a treat inside. I give the box to someone and they get to figure out what the box does and how to multilaterate the position the box “wants” to reach.
20130528-141119.jpg
Most of the time, the box is in a very-low-power sleep mode. Pushing the doorbell button on the front wakes up the microcontroller and the box attempts to acquire a signal with it’s GPS receiver. Once the location is determined, the box runs some math to calculate the distance to it’s secret location. If the distance is within the threshhold (usually a tenth of a mile or so, depending on the location I pick), the box congratulates the recipient and unlocks its interior latch. If the distance is too far, the box replies with “Access Denied”, tells the recipient how many attempts they have remaining (after 20 button presses, the box locks permanently), and then displays the distance to the desired location. Eventually, the recipient should figure out that they should travel to different locations around town to push the button and draw some circles on a map to see where the distances intersect.
20130528-141412.jpg
On the top of the exposed lid you see a magnetic child safety cabinet lock that I repurposed to use a backdoor in the event of a malfunction or a failure to locate the secret location. Down and to the left is an EM-406A GPS module from SparkFun Electronics. To the right is the 16×2 LCD that Adafruit sells for just $10. Moving to the bottom portion of the box, most of the wires lead to the Arduino Duemilanove board. To the right of that is a small circuit board that comprises the Pololu Power Switch that lets the Arduino disconnect its own power. Right some more you see the black Radio Shack battery case. I had to switch to a solidly enclosed version because the open type let the AA cells fall out too easily. On the left side of the bottom portion of the box I mounted a servo I had leftover from a Vex robot kit. The servo drives a latching mechanism I designed and built using sheets of PVC. The top lid latch engages the keeper on the bottom, unless a strong magnet disengages the lid latch or my servo slides the keeper to one side upon the solving of the puzzle.
20130528-141722.jpg

When testing my reverse geocache, I found that it was rather tricky to solve, logistically speaking. I figured that the recipient of the box would simply grab a map, drive a fair distance, push the button, draw a circle of the radius specified by the box’s “Distance:” clue, and repeat until they had multilaterated the desired position. Simple, right? Turns out the trickiest part was drawing the circles. Even if you have a paper map that covers the area in question, you probably don’t have a compass that can draw a big enough circle. It isn’t any easier to do within Google Maps or Google earth. There are sites that will draw you one circle on Google Maps, but I could find none (as of December 2010) that would overlay multiple circles. So I wrote my own.
Please note that I made this only for the creator of the box to use in quickly and thoroughly testing the accuracy of the math. I did not write this page to lessen the challenge for recipients of reverse geocaches.